This program was an introduction to the Direct Memory Access (DMA) on the Raspberry Pi Pico. The RP2040 DMA controller has separate read and write master connections to the bus fabric, and performs bulk data transfers on a processor’s behalf. This leaves processors free to attend to other tasks, or enter low-power sleep states. The data throughput of the DMA is also significantly higher than one of RP2040’s processors. The DMA can perform one read access and one write access, up to 32 bits in size, every clock cycle. There are 12 independent channels, each which supervise a sequence of bus transfers. The resources for the project include the C SDK User Guide, the RP2040 Datasheet and Prof. Hunter's website.
/*
 * Parth Sarthi Sharma (pss242@cornell.edu)
 * Code based on examples from Raspberry Pi Foundation.
 * The code initializes a DMA channel and copies the
 * contents of an array to another array.
 */

#include <stdio.h> //The standard C library
#include "pico/stdlib.h" //Standard library for Pico
#include "hardware/dma.h" //The hardware DMA library
#include "pico/time.h" //The pico time library

#define SIZE 256 //The size for data transfers

int src[SIZE]; //The source array
int dst[SIZE]; //The destination array

int main(){ //The program running on core 0
    stdio_init_all(); //Initialize all of the present standard stdio types that are linked into the bin

    int chan = dma_claim_unused_channel(true); //Claim a free dma channel

    sleep_ms(5000); //Sleep for 5 seconds

    int i; //The counter i
    for(i = 0; i < SIZE; i++){ //For the sine table size
        src[i] = i; //Fill in the source array
        printf("Source[%d]: %d\n", i, src[i]); //Print the source array
    }

    dma_channel_config c = dma_channel_get_default_config(chan); //Get the default channel configuration for a given channel
    channel_config_set_transfer_data_size(&c, DMA_SIZE_32); //Set the size of each DMA bus transfer as 32 bits
    channel_config_set_read_increment(&c, true); //Set DMA channel read increment
    channel_config_set_write_increment(&c, true); //Set DMA channel write increment

    dma_channel_configure(chan, &c, dst, src, SIZE, true);//Configure all DMA parameters and optionally start transfer
    dma_channel_wait_for_finish_blocking(chan); //Wait for a DMA channel transfer to complete

    for(i = 0; i < SIZE; i++){ //For the sine table size
        printf("Destination[%d]: %d\n", i, dst[i]); //Print the destination array
    }
}
The first lines of code in the C source file include some header files. The headers which come from the C SDK for the Raspberry Pi Pico include pico/stdlib.h is what the SDK calls a "High-Level API." These high-level API's "provide higher level functionality that isn’t hardware related or provides a richer set of functionality above the basic hardware interfaces." The architecture of this SDK is described at length in the SDK manual. All libraries within the SDK are INTERFACE libraries.
The next includes pull in hardware APIs which are not already brought in by pico/stdlib.h. These include hardware/dma.h and pico/time.h. As the names suggest, these interface libraries give us access to the API's associated with the hardware dma and the pico time on the RP2040..
Don't forget to link these in the CMakeLists.txt file!
#include <stdio.h>
#include "pico/stdlib.h"
#include "hardware/dma.h"
#include "pico/time.h"
The next section of the code is the #define's and the global variables which will be used throughout the code.
The following are the #define's to be used throughout the code:
The following are the variables to be used throughout the code:
#define SIZE 256

int src[SIZE];
int dst[SIZE];
stdio_init_all();
In order to fetch an unused DMA channel, I used the dma_claim_unused_channel().
int chan = dma_claim_unused_channel(true);
The aim is to copy the contents from one memory location to other. Hence, I initialized a source array using a for loop.
int i;
for(i = 0; i < SIZE; i++){
    src[i] = i;
    printf("Source[%d]: %d\n", i, src[i]);
}
Finally, I configured the DMA channel using a series of commands. First, I used the dma_channel_get_default_config() function to fetch the default configurations. Next, I used the channel_config_set_transfer_data_size() fcuntion to set the transfer size to 32 bits. Lastly, I used the channel_config_set_read_increment() and channel_config_set_write_increment()to set the read and write to increment the address after each transfer.
Once the configurations are set, I used the dma_channel_configure() function to set the destination, the source and the size of the transfer. The dma_channel_wait_for_finish_blocking() function waits until the DMA channel is done transfering.
dma_channel_config c = dma_channel_get_default_config(chan);
channel_config_set_transfer_data_size(&c, DMA_SIZE_32);
channel_config_set_read_increment(&c, true);
channel_config_set_write_increment(&c, true);

dma_channel_configure(chan, &c, dst, src, SIZE, true);
dma_channel_wait_for_finish_blocking(chan);
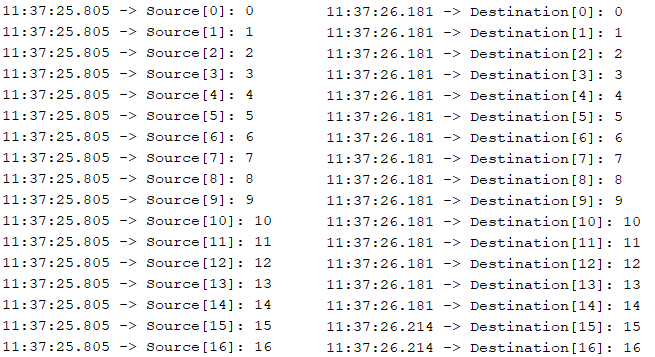
To verify the result of the DMA trasnfer, I printed the contents of the destination array on the console using a for loop.
for(i = 0; i < SIZE; i++){
    printf("Destination[%d]: %d\n", i, dst[i]);
}
The output of the DMA transfer is shown below. As it is quite evident, the DMA transfer was successful.

cmake_minimum_required(VERSION 3.13)

include(pico_sdk_import.cmake)

project(HelloDMA)

pico_sdk_init()

add_executable(HelloDMA HelloDMA.c)

pico_enable_stdio_usb(HelloDMA 1)
pico_enable_stdio_uart(HelloDMA 1)

pico_add_extra_outputs(HelloDMA)

target_link_libraries(HelloDMA pico_stdlib hardware_dma pico_time)